
A webinar recap with Barry Kelly, Jessie Gold and me, Kellie Petruzzelli
With so many remote learners, it’s critical to get good at building online courses. Self-paced online courses can come in many flavors and sizes and sometimes the most challenging decision is where to start and what to build. Our recent webinar looked at solving this challenge and we’ve provided the details for you, below.
The self-paced model provides learners with a lot of flexibility. It allows them to take a course when they’re ready, engage in content at their own pace, engage at different levels, pick it up, drop it, and come back later. It offers a different level of convenience and interaction for remote learners. It expands your addressable market because now individuals are able to access content wherever they are at any time. And, if you’re selling the training, it is highly profitable. You develop it once and deliver perpetually.
We’ve seen evergreen courses that were created once and were used hundreds and thousands of times, and generating hundreds of thousands of dollars in revenue. It’s a very powerful delivery mechanism and way of packaging training.
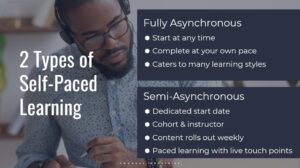
When we talk about self-paced learning, we talk about two types.
Fully asynchronous training
The first is the fully asynchronous concept, which has rolling start dates. Anyone can turn up at any point in time, complete the training at any point in time. Jump back and forth from section to section if they want to. Come back, drop it, come back a month later, pick it up again, download materials, etc. They move through the course at their own pace.
From an enrollment standpoint, asynchronous is a bit more challenging because there is no compelling start date, so you’ve got to make sure you’re creating a compelling event.
Semi asynchronous training
The second concept is semi-asynchronous. You’re using the same template, the same approach, but the difference is you have a dedicated start date.
Let’s say the course is an eight-hour experience. You could make it a four-week course. Roll out content, week one, roll out content for week two, etc. This allows you to create a cohort of learners who are moving through the content together.

With fully asynchronous courses you can jump in and move from section to section at any point in time. All content in the course is made available immediately.
Engagement becomes critical because the individuals are by themselves, there’s no assignment due dates, there’s no start dates, there’s no class get-together. These courses must be highly interactive, including social learning – communication between individuals who are moving through the course at their own speed.
Learner notifications, which will ping the learner at certain events or time points are also very important. When section one is complete, send them a note, say, “Great job. Keep up the good work.” Or send a reminder to log in.
If a certain number of individuals haven’t made it to the end, don’t panic. It may mean that the course is compelling individuals to be creative or apply some of the principles they learned now and they may come back later.
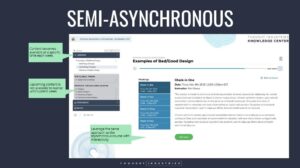
The semi-asynchronous model uses the same interface and the same approach but slightly different. Each section becomes available at a particular time. It keeps the cohort together in that time period and it’s a great way of allowing individuals to move through the course in a linear fashion with all the cohort and the other individuals around them.
This concept allows you to embed virtual meetings. You can integrate Zoom, Adobe Connect, or GoToTraining, GoToWebinar, WebEx, etc. for scheduled live events.
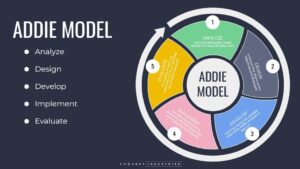
This is the ADDIE instructional design model. ADDIE is tried and true, and most other models are really just different permutations of this. Think of this as an iterative process that you go through during the creation of courses.
1. Analyze
The first step in the ADDIE model is Analyze. If we had one recommendation for anyone who’s building an online course, it’s that you should not skip this step. This is where you sit down with your stakeholders, with your subject matter experts, with your instructional designers, and you say, “What are the goals? What are the big questions? Who are we trying to reach? What do they need to know?”
Not only is it going to make the actual development of your courses easier, it’s also going to create a lot more of a coherent learning experience for your learners.
2. Design
The next phase is Design. This is where you take all your goals and targets and design the framework of the course. What’s it going to look like? What are the structures? How are we meeting the goals that we identified?
3. Develop
Most people really like the Develop phase because this is where you’re creating all of the fun assets that you’re going to use in the course, whether it’s text, video, assessments, interactive activities, etc.
4. Implement
We’re going to focus on the first three steps in ADDIE in this blog, but the other two are just as important. Number four is Implement. This is where you’re actually taking this wonderful thing that you built and putting it out to the world. Kicking it out of the nest and hoping it can fly.
5. Evaluate
We don’t want to call the next step the last step because it’s an ongoing process. The Evaluate step is where you’re determining whether or not what you built was successful. You’re reviewing assessments to see how well your learners are doing, how well they’re absorbing the knowledge, and then you’re making iterative changes to improve the experience as you go.
In an ideal world you’d never really stop evaluating because there’s always things you can improve.
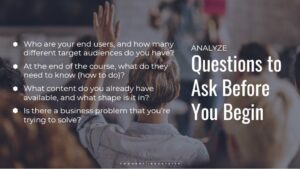
Let’s talk a little bit about the Analyze phase. The most important questions to ask at the beginning of this are;
- Who are your end users?
- Who are these people that you’re trying to teach?
- What are their demographics?
- What are their individual needs?
- What are their personas?
You may be lucky – maybe you just have one type of end user. Or you may have different target demographics. Make sure that you have very clear personas and a clear understanding of who these people are.
The next is; what do I need to know how to do? If you’ve heard the terms learning objectives or learning outcomes, that’s where this comes into play. It’s not just what they need to know, but it might also be what do they need to know how to do? How can they demonstrate that they absorbed the learning?
The next one is a bit more practical. What kind of content do you already have? You don’t necessarily have to re-build the wheel if you already have some parts. This is a good time to take an audit of what you already have, start to align it to the goals that you identified, see what you can use out of the box, see what needs to be tweaked and see what unfortunately needs to be scrapped.
The last one is; what’s the business problem that you’re trying to solve? It could be anything from onboarding new employees, training customers on your products, etc. What does success look like for your customers at the end?
The goal is to make sure that you have a well thought out plan.
Let’s not forget about the learning experience. Central to this is the context – where is the learner going to be? Are they at their desk, in the kitchen, or in the field? We want to make the content and the experience useful and compelling.
Putting the Design Phase into Action: The Blueprint
Let’s go through some instructional design best practices, which are also excellent organizational tools.
During the Design phase, you’re building out what your course is going to look like. You’re templatizing it, producing a blueprint. It’s a table of contents where you take all the ideas that you want to present and put it into a form that will make it a lot easier.
The idea is to stay organized and follow a framework. Use whatever kind of tool works for you and build out a table of contents. Think of it like chapters of a textbook, in the cadence of sections, lessons and page format.
It all goes into a reproducible framework, so when you move from concept to concept, familiarity works for you. I know that I’m going to read a text summary at the top of this section or lesson to help me understand what I’ll learn.
Building the Media Assets for Self-Paced Learning
Let’s dig into developing media assets for your self-paced learning, including audio and visual media assets. Imagery can help communicate ideas more effectively and adding an audio aspect can help keep learners’ attention.
Information presented by video can be easier to absorb than the written word. Everyone learns slightly differently, so curating your content and having different ways to adapt to different types of learners is important.
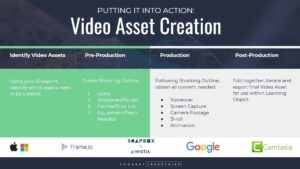
Here are some tips and tools for video asset creation. There are four phases:
- Identify the assets you need to create
- Pre-production, or the planning time before producing the video
- Production, which is shooting, recording audio, getting all the content you need
- Post-production, editing and iterating.
The blueprint you created will identify the areas the video assets need to address.
Pre-production is super important. We, at Thought Industries use a shooting outline for each video we create. It’s like a mini blueprint for your video. It sets you up for success.
- First, what are your goals for this video?
- What do you want the learner to take away?
- How quickly do you need this video to be created?
Then, storyboarding and scripting help you plan out the beginning, the middle and the end of your video.
Writing a final script from start to finish is important. Once you have your storyboard, your script and your goals aligned, you can move on to actually deciding the format and developing a shot list. From there, you can identify the equipment and the team you need.
As we look at production and post-production, available resources will vary from company to company and from project to project. There is always a way to make a quality product with the resources that you have. It takes making the right decisions in the pre-production process regarding what we can actually afford.
Post-production is where you tie everything together, so editing is critical. You can hire someone, or you can use software that is built into your computer, like iMovie on Apple. Also, Frame.io is a tool that allows you to iterate and comment on videos that are currently being edited so you can communicate with your team, even if they are remote.
Which self-paced online courses are right for you? Asynchronous or semi-asynchronous?
We’ve seen organizations use both types because it’s really about the audience and the reach.
Sometimes you present both options. It’s the same content with small differences. Perhaps with the semi-asynchronous you add a live event and scheduled check-ins.
If you’re selling online courses, fully asynchronous courses have a certain value. The semi-asynchronous courses may earn a premium because learners are being coached and they have access to an individual instructor.
The quality of experience, the quality of your product, what you do and how you deliver it are your critical success factors.
And then, the final stage of ADDIE: Evaluate.
Learn, iterate and continuously improve.
If you missed our webinar, “Creating Effective Self-Paced Online Courses,” I hope this was helpful. For additional insights and Q&A, view the full recording.